
Shibori dyeing, to me, has always felt a little synonymous with summertime (probably because of all of the tie-dye I used to do as a kid during summer breaks). And while I have several shibori tea towels, and scarves that I've collected over the years, I had never actually dyed any of them myself. This summer I made it my mission to change that!
So, a few months back when I saw that Miranda Anderson of Live Free Creative Co. would be teaching a shibori Indigo Dyeing workshop at The Paper + Craft Pantry I had to sign up. Miranda was such an encouraging instructor and I left feeling like a pro. She even incorporated a little history and science into her workshop, which I loved!
Ever since, I have been brainstorming ideas for a fun D.I.Y. that incorporated shibori. I kept circling back to the fact that my dog-child Ru was in dire need of a new bed. Her's was previously a beige—aka dirty-all-the-time—soft foam—aka sunken in—bed from a pet store, and honestly a complete eyesore. I had been wanted something for a while that would both compliment the decor in my new digs and hide the stains from Ru's messy paws, but after an endless search online just wasn't able to find anything I liked.
So, I consulted Miranda on a durable fabric she would recommend using, and then rounded up some sturdy foam from Capitol City Upholstery Supply and a enlisted a little sewing help (because box cushions are way more complicated than they look, y'all). I'm so pleased with how it turned out! It adds a bold pop of color to my living space, and Ru seems to enjoy lazing around on it too! 🐶
Keep reading below for a little tutorial on how to make your own customized shibori dyed fabric at home!
D.I.Y. INDIGO DYED FABRIC
PROJECT DURATION: 2 HOURS
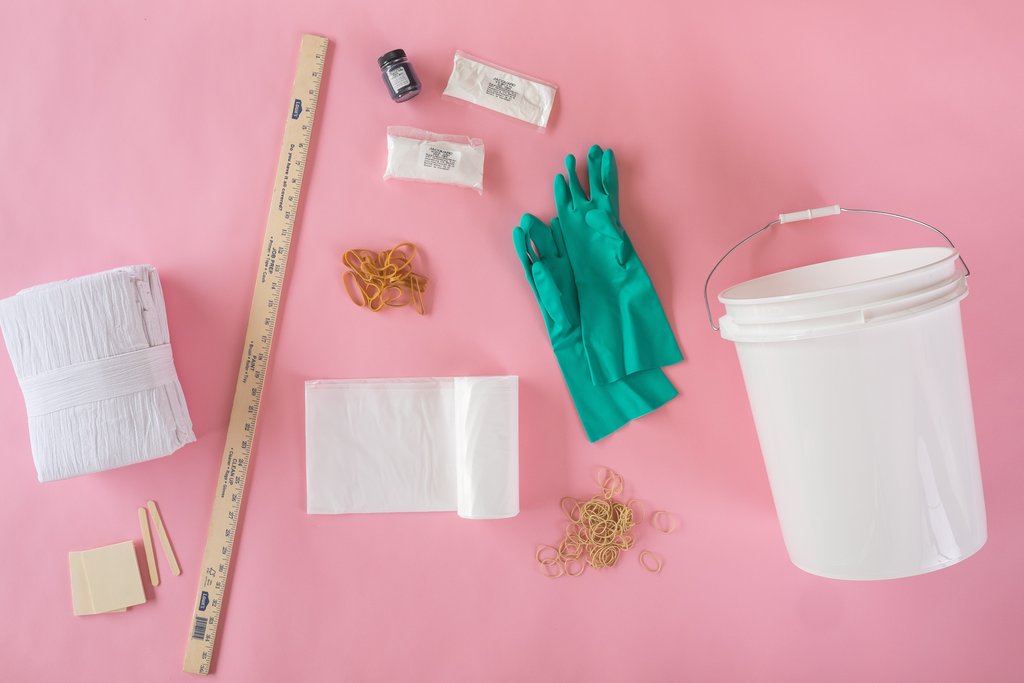
SUPPLIES
Indigo Dye
Reducing agent (Soda Ash + Thiox)
Gloves
Stir sticks
Rubber bands/wood blocks
5 gallon jug
Warm water
Fabric you wanna dye (I used cotton duck cloth for this project)
Plastic drop cloth
INSTRUCTIONS
Fill a 5 gallon bucket with warm water
Add indigo dye, soda ash + Thiox
Stir vat in one direction until all ingredients are dissolved and bubbles start to form
Stop stirring that direction and make one circle in the opposite direction with your stir stick—stop
Place lid tightly over your bucket for about 30 mins.
Tie, wrap and then block off your fabric using rubber bands and wood blocks. I used twists and rubber bands to create a circular pattern on my fabric so that it turned mostly blue. However, there are tons of designs and patters you can play around with to create your desired effect.
Put on gloves and dunk your fabric until all part of fabric are soaked with indigo.
Remove fabric, let it drip a tad into the bucket and then lay fabric out to oxidize (it will turn from green to blue!)
Dunk your fabric several more times until you get the desired saturation of color - from 1 to ~10 times (I did 6 dunks in total for this project). *Keep in mind that, once washed and dried, your fabric will look a little lighter than it does wet*
Untie and unfold your project, and rinse fabric until water runs clear
Wash & dry fabric in washing machine!
Now brainstorm ways to turn your beautiful fabric into a custom piece—a dog bed, shift dress, pillow, tea towel—the options are endless!

